gllm
gllm - Golang Command-Line LLM Companion
gllm is a powerful CLI tool designed to interact seamlessly with various Large Language Models (LLMs). It supports features like interactive chat, multi-turn conversations, file attachments, search integration, a command agent, multi-agent workflows, deep research, mcp services and extensive customization.
🚀 Features
- Flexible Model Selection: Easily configure and switch between different LLMs.
- Multi-API compatibility: Compatible with OpenAI API, Anthropic API, and Google Gemini API.
- Interactive Session / REPL: Start real-time conversations by simply running
gllm. - Editor Integration: Use your preferred text editor for comfortable multi-line input in chat mode.
- Prompt Templates & System Prompts: Manage reusable prompts and instructions.
- Attachment Support: Process files, images, and URLs as part of your queries.
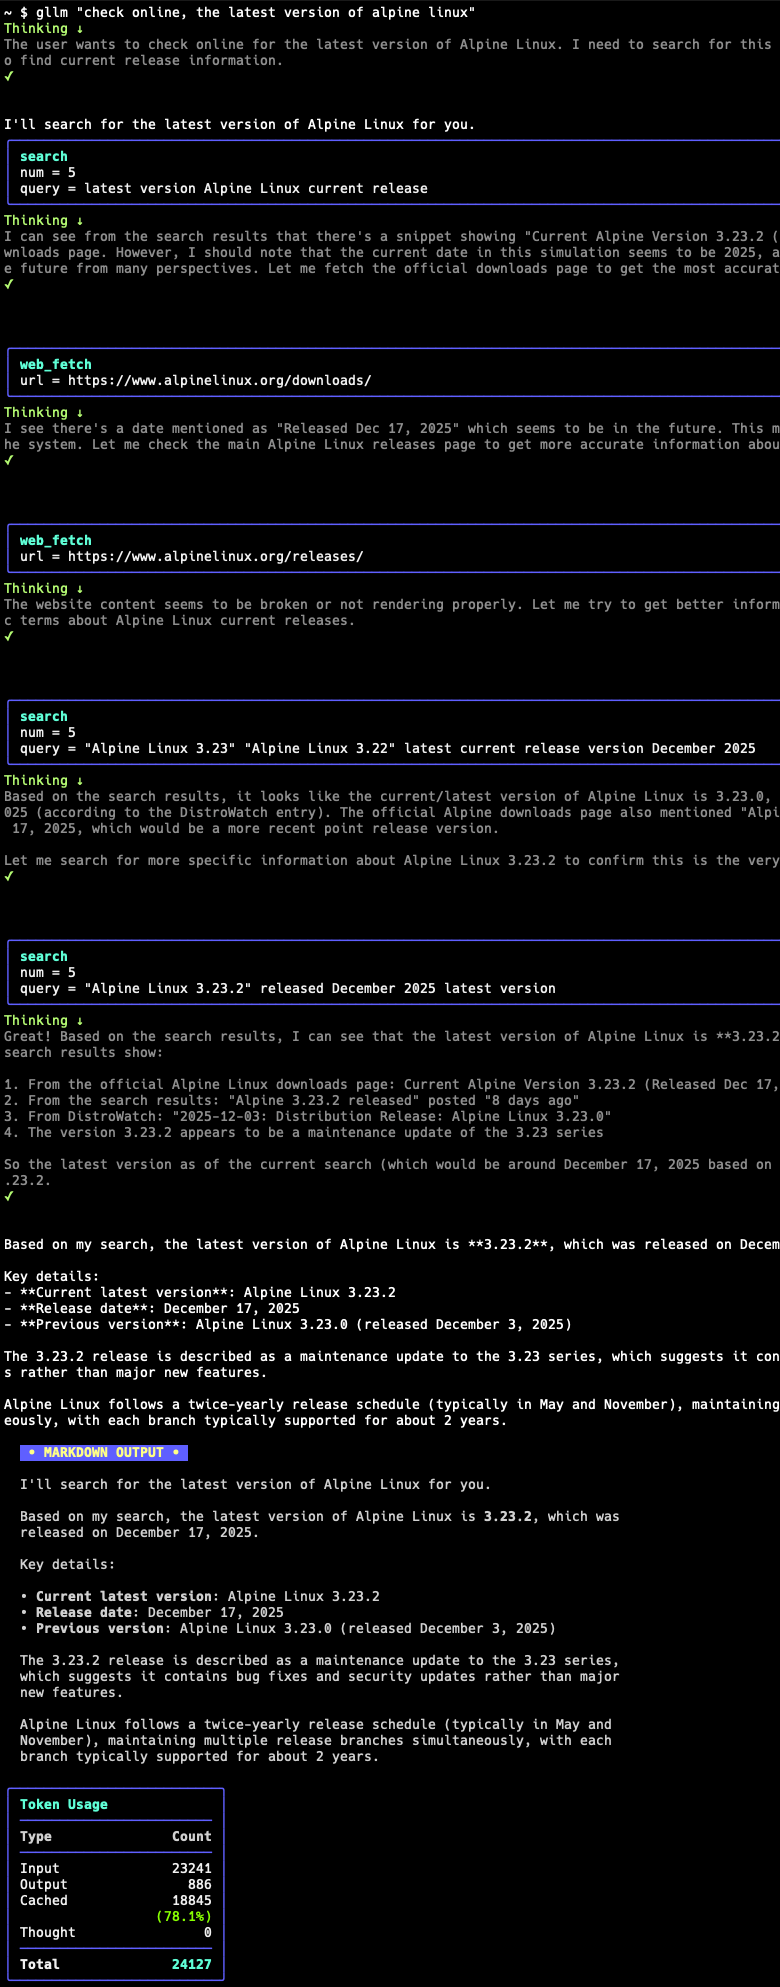
- Search Integration: Use search engines to find the latest and most relevant information.
- Web Retrieval: Extract comprehensive text content from URLs, including websites, raw text files, and PDF documents.
- PDF & Image Processing: Supports processing of PDF documents and images with capable models.
- Reasoning & Deep Thinking: Generate detailed explanations, logical breakdowns, and step-by-step analysis.
- Markdown Support: Renders Markdown for easy-to-read formatted output.
- Multi-turn Sessions: Engage in multiple rounds of conversation and manage session history.
- Command Agent Mode: Let LLMs plan and execute commands with your confirmation.
- Plan Mode: Review and approve the agent’s proposed plan before execution.
- Yolo Mode: Skip confirmations and let the agent execute actions immediately for faster, uninterrupted task completion.
- Model Context Protocol (MCP) Support: Connect to external MCP servers to access additional tools and data sources.
- Token Usage Tracking: Monitor your token consumption.
- Configuration Management: Easily manage models, templates, system prompts, and search engines.
- Memory Management: Remember important facts about you across sessions for personalized responses.
- Context-Aware Agent Switching: Agents can hand off tasks to other specialized agents with full context and instructions across different LLM providers.
- Context Compression: Auto compress session history to avoid exceeding the model’s context window by using summarization or truncate oldest messages.
- Sub-agents and Delegation: Orchestrate sophisticated multi-agent behaviors using state-of-the-art models for parallel task execution and save context window.
- Agent Skills: Support agent skills, switch skills on and off, install from Git/local paths with smart discovery, and update from remote sources.
- @ Reference Support: Reference files and directories directly in prompts using @ syntax for seamless context inclusion.
- Workflow & Skills Commands: Define and execute workflows and skills as commands for streamlined operations.
- Colorful Themes: Supports hundreds of popular themes, compatible with light and dark modes, ANSI-color, and full true-color.
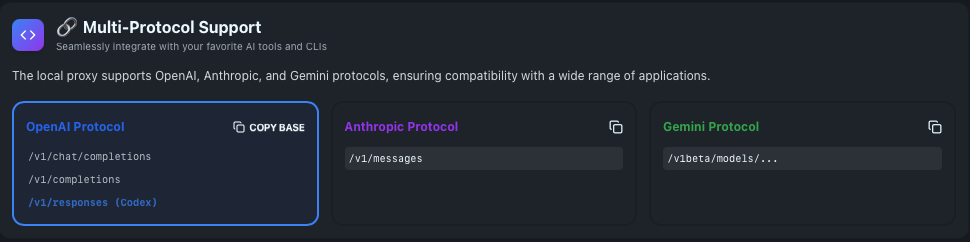
- API local Proxy: Supports Multi-Protocol (OpenAI, Anthropic, Google Gemini) local API reverse proxy, ensures seamless compatibility with a wide range of applications.
- Cross-platform Support: gllm is available for macOS, Windows, and Linux, and easy to install and update.
📌 Installation
Homebrew (macOS)
brew tap activebook/gllm
brew install gllm --cask
brew update
brew upgrade gllm --cask
Scoop (Windows)
scoop bucket add gllm https://github.com/activebook/scoop-gllm.git
scoop install gllm
Shell (Alpine Linux/Ubuntu/CentOS/MacOS)
curl -fsSL https://raw.githubusercontent.com/activebook/gllm/main/build/install.sh | sh
Multi-Platform Self-Update
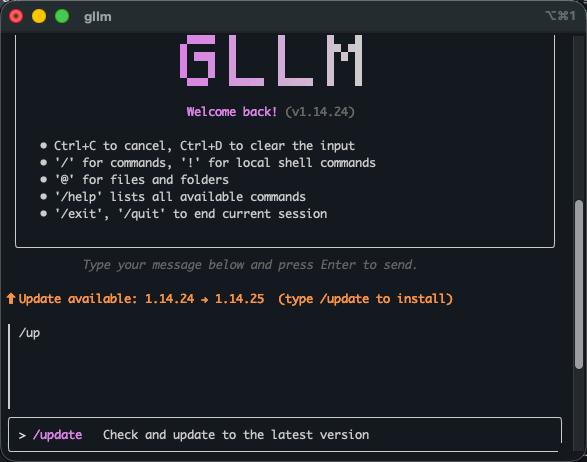
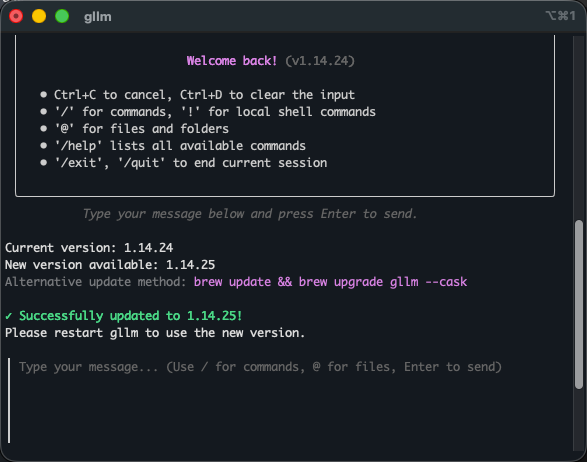
gllm includes a built-in self-update mechanism that automatically checks for new versions in the background. You can also manually trigger an update or check the current status.
| Background Update Notification | Manual Update with /update |
|---|---|
 |
 |
Build from Source
git clone https://github.com/activebook/gllm.git
cd gllm
go build -o gllm
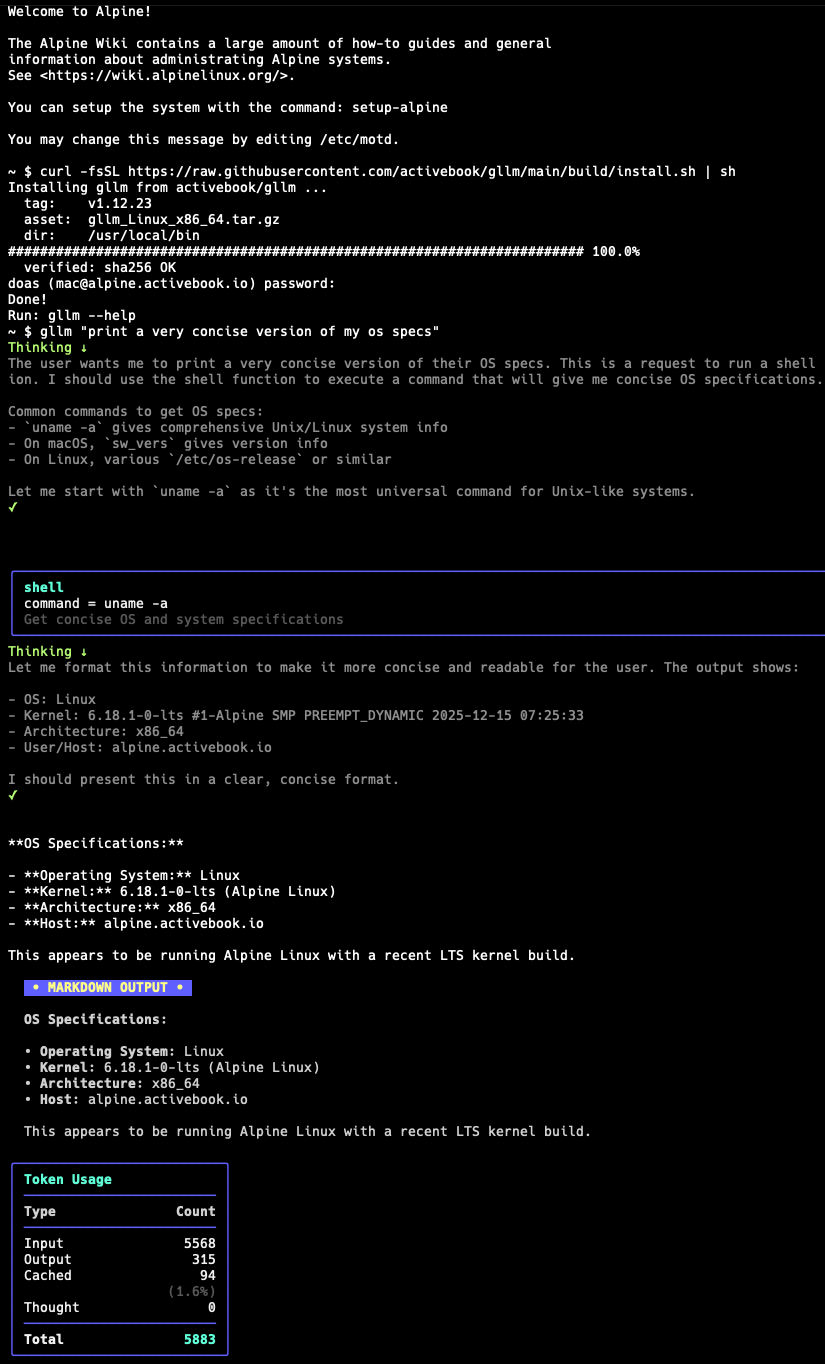
eg. Run on Alpine Linux
| Run on Linux | MCP Run on Linux |
|---|---|
 |
 |
💡 Initialization
The easiest way to get started is to run the interactive initialization wizard:
gllm init
This will guide you through setting up your preferred LLM provider, API keys, and default settings.
🎯 Usage
Basic Commands
-
Ask a simple question:
gllm "What is Go?" -
Use a specific model:
gllm "Where is the best place to visit in London?" -m gpt4o -
Use a template for a specific task:
gllm "How to find a process and terminate it?" -p shellmate -
Search the web:
gllm "Who is the current POTUS?" -s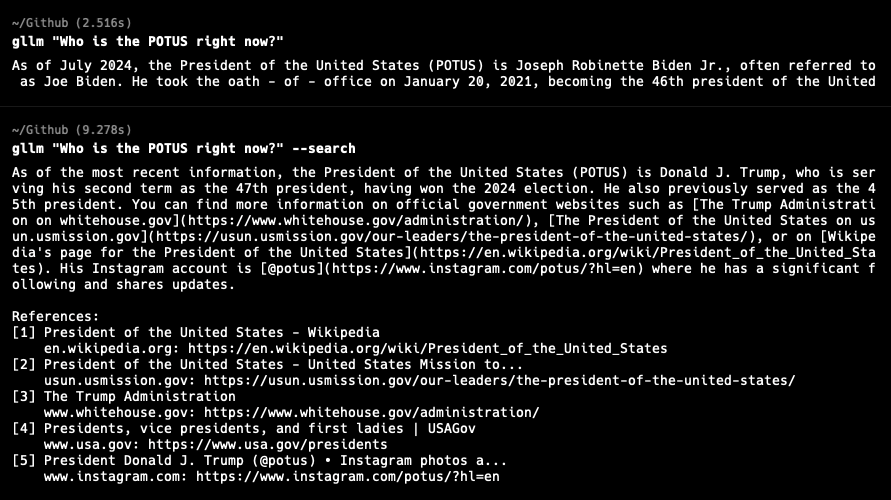
-
Reference files in prompts:
gllm "Give me an overview of the project structure: @cmd/ and @service/"
gllm "I'm considering refactoring this code. Analyze the current structure and suggest improvements: @service/agent.go @service/openai.go"
gllm "Document this new feature based on the code: @service/atref.go and @test/test_atref.go"
Shell Completion
To enable tab completion for gllm commands in your shell, add the following to your shell configuration file:
# For bash, add to ~/.bashrc or ~/.bash_profile
gllm completion bash > ~/.gllm-completion.bash
echo 'source ~/.gllm-completion.bash' >> ~/.bashrc
After adding the appropriate line to your shell configuration file, restart your shell or run source ~/.bashrc (or the equivalent for your shell) to enable completion.
Interactive Session / REPL
Start an interactive session by running gllm without any arguments or prompt:
gllm
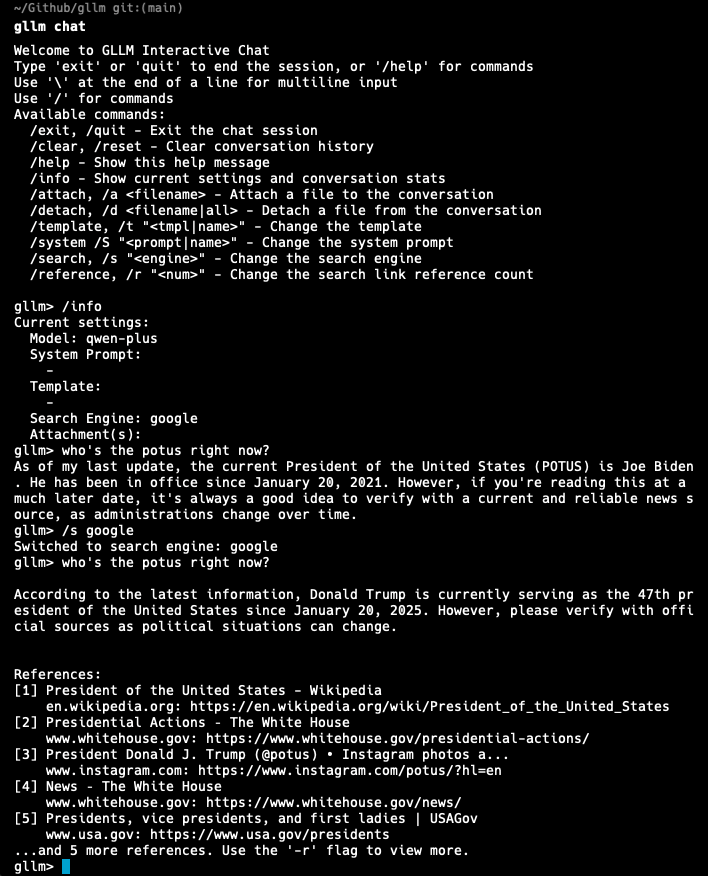
Within the chat, you can use various commands:
/help: Show available commands./history: View conversation history./system <prompt>: Change the system prompt./attach <file>: Attach a file to the conversation.! <command>: Execute a shell command.@ path: Reference a file or directory in your prompt.
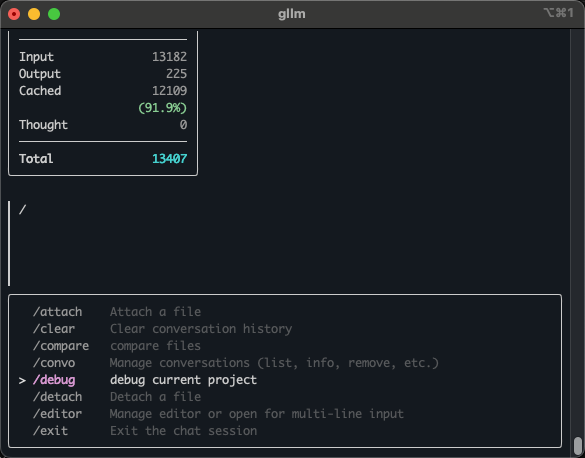
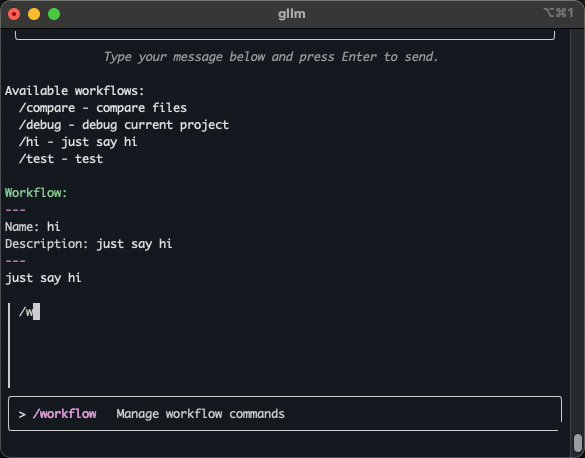
Workflow Commands
Workflow commands are predefined sequences of actions that can be executed with a single command. They are stored as markdown files in the workflows directory.
| Use debug command | Workflow commands |
|---|---|
 |
 |
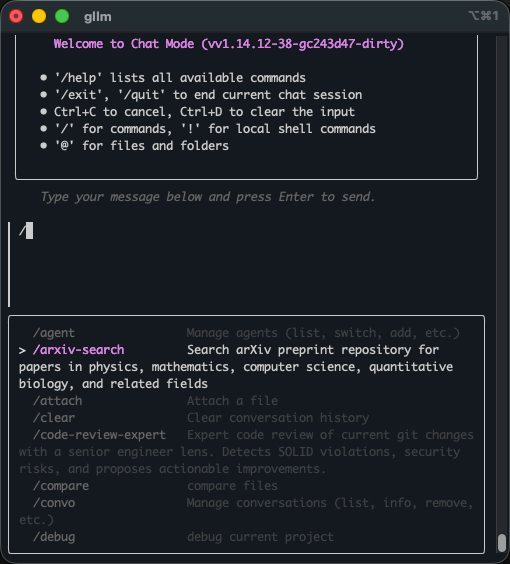
Skills Commands
Skills are reusable sets of instructions that can be invoked with a single command. They are stored as SKILL.md files in the skills directory.
| arxiv skill command | Code skill command |
|---|---|
 |
 |
Multi-Line Input with Editor
For longer messages or code snippets, use your preferred text editor directly in an interactive session:
# In a session, type:
/editor
/e
✨ In a session, you can copy/paste text/code
How to use:
- Open prefered editor
- Compose your message
- Save and exit the editor
- Review the content in the session
- Press Enter to send or Ctrl+C to discard
Setup your editor:
# Set your preferred editor (vim, nano, code, etc.)
gllm config editor switch vim

# List available editors
gllm config editor

# Check current editor
gllm config editor
Multi-turn Sessions
There are two main ways to have a multi-turn conversation:
1. Single-Line Style (using named sessions)
You can maintain a session across multiple commands by assigning a name to your session with the -s flag. This is useful for scripting or when you want to continue a specific line of inquiry.
-
Start or continue a named session:
gllm "Who's the POTUS right now?" -s my_session gllm "Tell me more about his policies." -s my_session -
Session Management:
gllm session list
gllm session info my_session
gllm session remove my_session
2. Interactive Session Style (REPL)
For a more interactive experience, simply run gllm to enter a real-time session.
-
Start an interactive session:
gllmWithin the session, the history is automatically maintained.
-
Check session history:
in an interactive session, type: /history or /h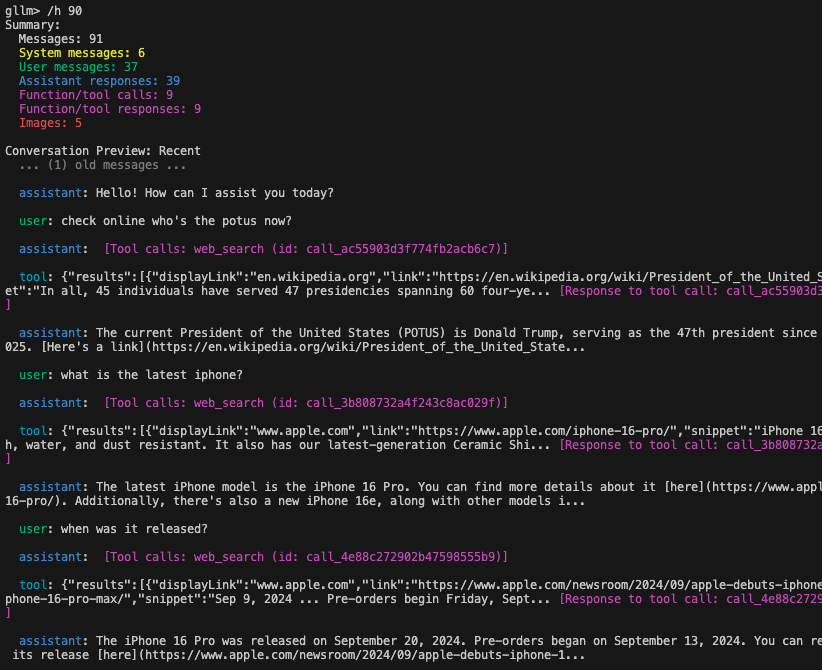
🧠 Context Management
gllm provides advanced strategies to manage session history when it approaches the model’s context window limit. You can choose between preserving space through truncation or summarizing the session to maintain full context.
Truncation Strategies
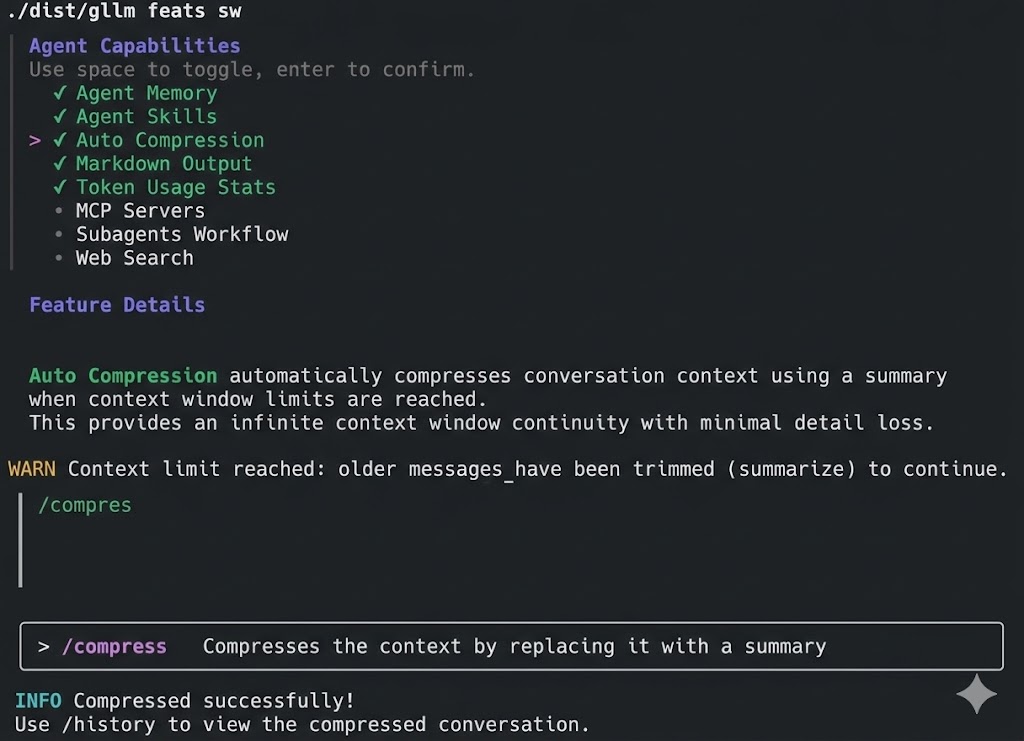
You can configure the strategy using gllm features switch->auto compression:
- Truncate Oldest (
truncate_oldest): The default strategy. It removes the oldest messages (user/assistant/tool pairs) while preserving system prompts and recent context. - Auto Compression (
summarize): Replaces the older prefix of the session history with an information-dense summary generated by the LLM itself. This preserves the “essence” of the session while freeing up significant token space.
Manual Compression
In an interactive session, you can manually trigger compression at any time:
> /compress
This reduces the entire preceding history into a single summary block followed by an acknowledgment, allowing you to continue a very long session without hitting context limits.
Memory Management
gllm can remember important facts about you across sessions, making conversations more personalized and contextual.
Memory Commands
gllm memory
gllm memory add "I prefer Go over Python"
gllm memory list
gllm memory clear --force  # Skip confirmation
gllm memory path
How Memory Works in Sessions
Memories are automatically injected into the system prompt, so the LLM will remember your preferences and context across all sessions:
Example:
# Start a session - the LLM will automatically consider your memories
$ gllm
> Remember this: I work primarily with Go and Docker
> Forget this: I love dark jokes
You can manually edit this file or use the gllm memory path command to find it.
File Attachments
-
Summarize a text file:
gllm "Summarize this" -a report.txt -
Analyze an image:
gllm "What is in this image?" -a image.png -
Process a PDF document (with a capable model like Gemini):
gllm "Summarize this PDF" -a document.pdf
Code Editing
The command agent supports diff editing for precise code modifications.
gllm "Read this file @build.sh and change function name"
| Edit code with diff | Cancel an edit |
|---|---|
 |
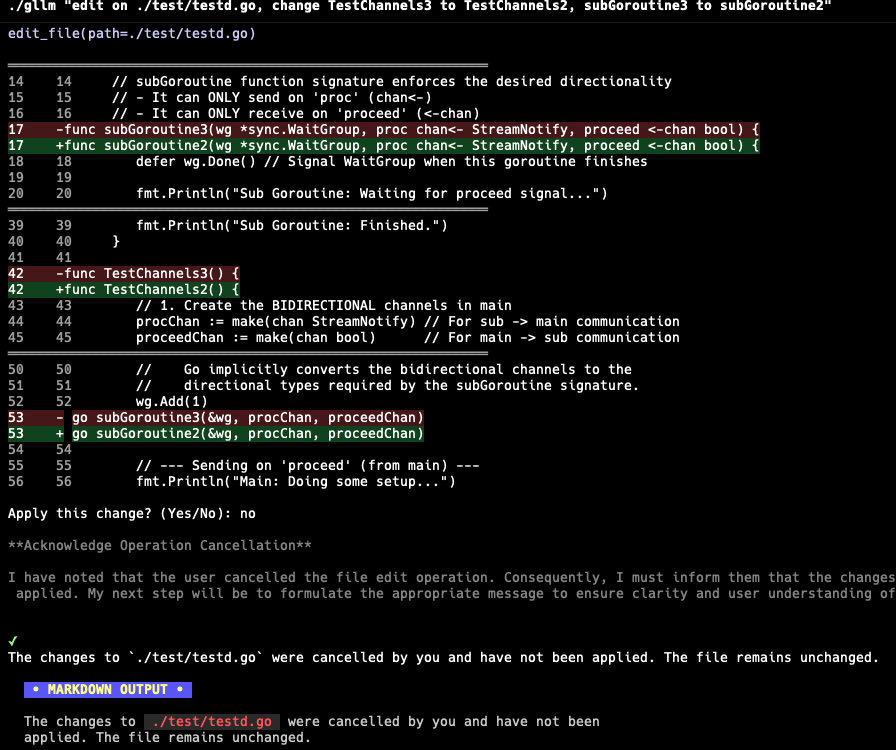 |
Plan Mode
Plan Mode allows you to review and approve the agent’s proposed actions before they are executed. This is particularly useful for complex tasks where you want to ensure the agent’s strategy aligns with your expectations.
| Plan Mode - Process | Plan Mode - Approval |
|---|---|
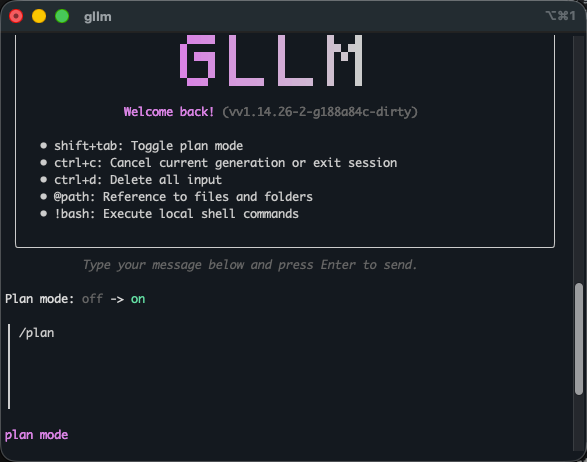 |
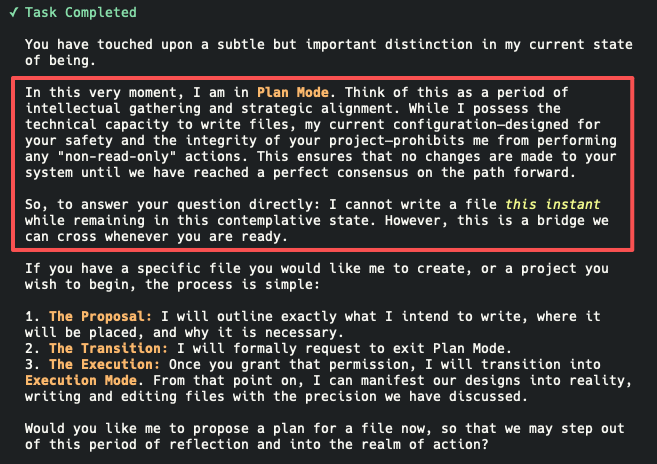 |
Sub-agents and Delegation
gllm introduces a powerful Sub-agents and Delegation system that leverages Agent Tools and State Tools to orchestrate complex, multi-agent tasks. This approach solves the traditional context window limitations by decoupling agent execution and using a shared state memory. SOTA LLMs like Gemini 3.0 and GPT-5.2 can handle complex workflows with ease.
How it Works
- Agent Tools (
spawn_subagents):- An Orchestrator agent can spawn independent sub-agents using the
spawn_subagentstool. - Each sub-agent runs in its own isolated context, preventing the “context window explosion” typical of long chains.
- Sub-agents can run in parallel, maximizing efficiency.
- An Orchestrator agent can spawn independent sub-agents using the
- State Tools (
set_state,get_state):- Instead of passing massive context strings, agents communicate via a high-speed, in-memory Shared State (also known as a Blackboard).
- An agent writes its output to a specific key in the blackboard (e.g.,
set_state(key="research_report", value="...")). - The next agent reads that key (e.g.,
get_state(key="research_report")) to retrieve information from the blackboard. - This keeps the communication channel lightweight while preserving the full depth of data in memory.
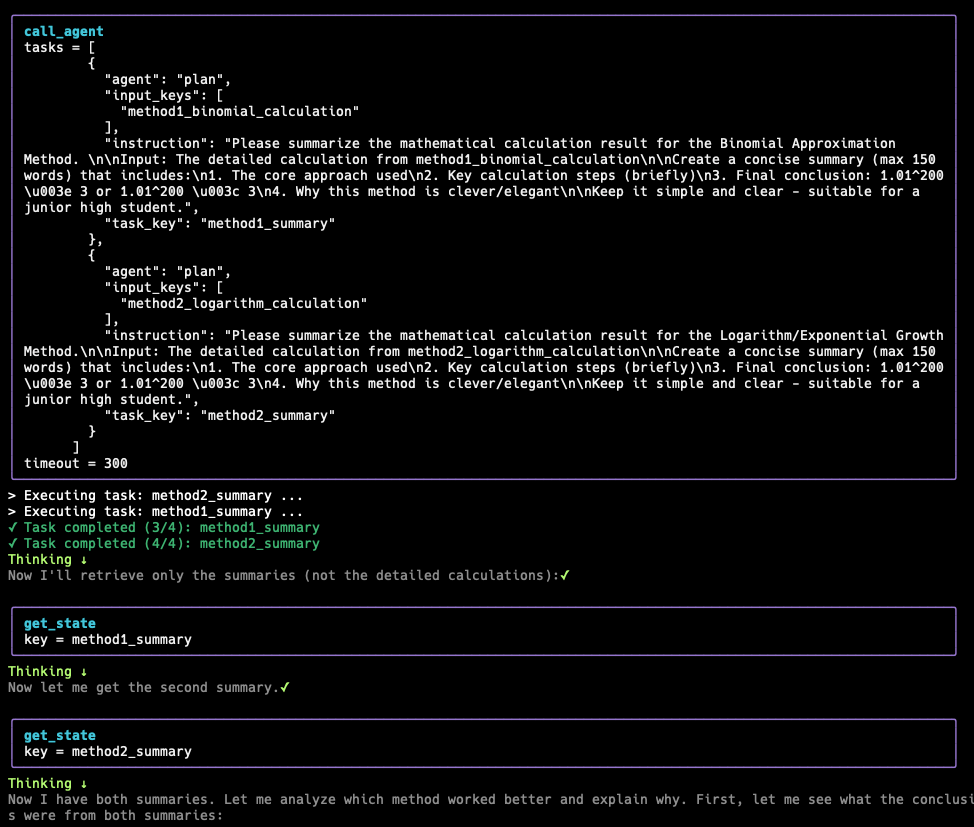
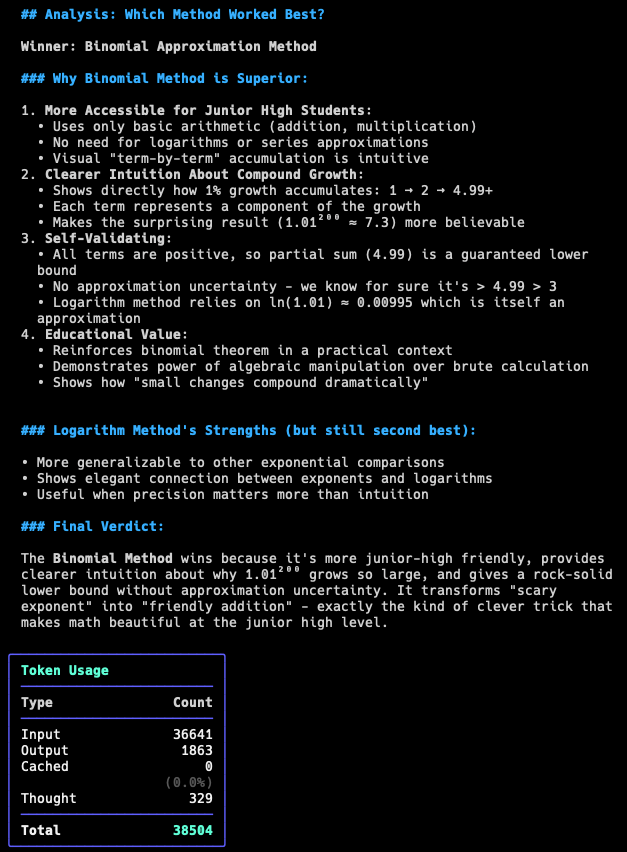
Deep Research Workflows
Build complex workflows where agents collaborate autonomously.
| GPT-5.2 Workflow | Gemini 3.0 Workflow |
|---|---|
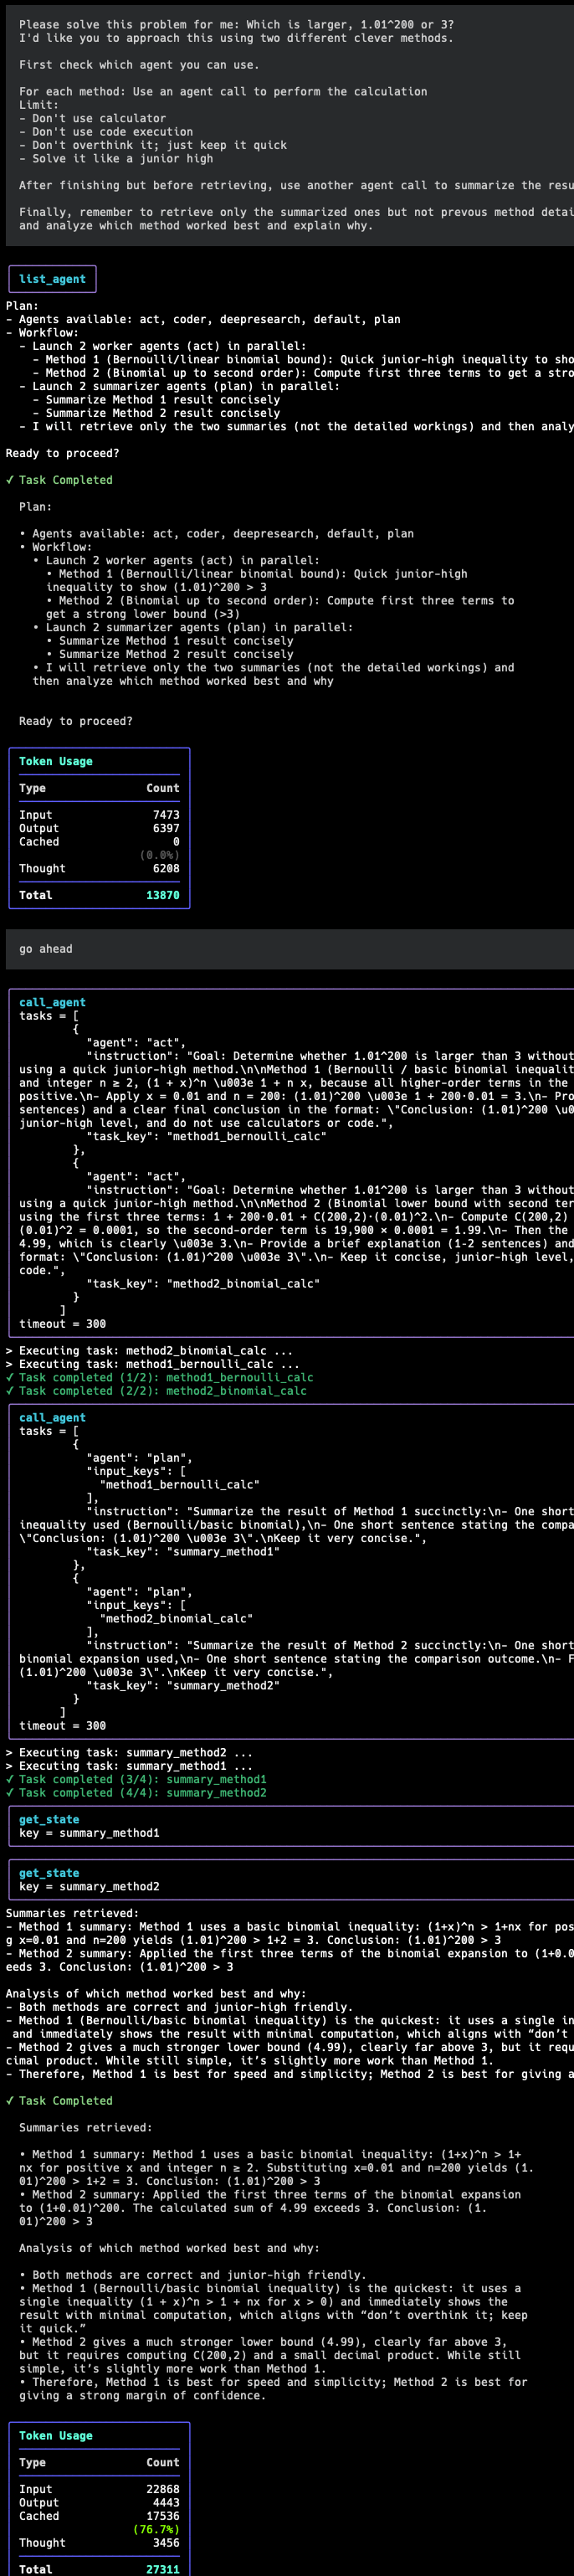 |
   |
| DeepSeek V3.2 Workflow | Qwen Workflow | LongCat Workflow |
|---|---|---|
   |
 |
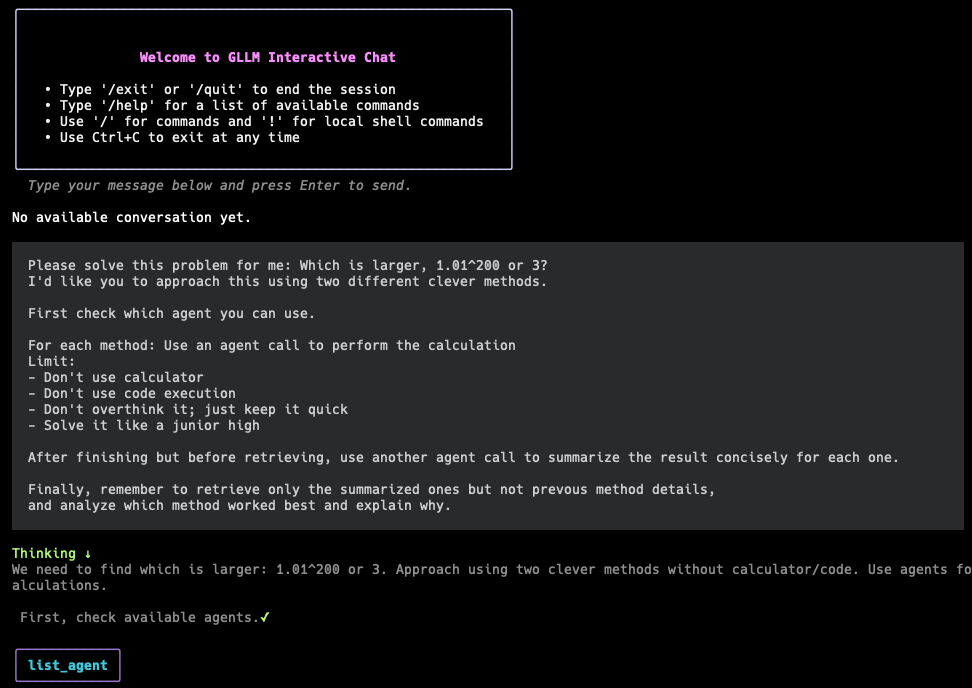 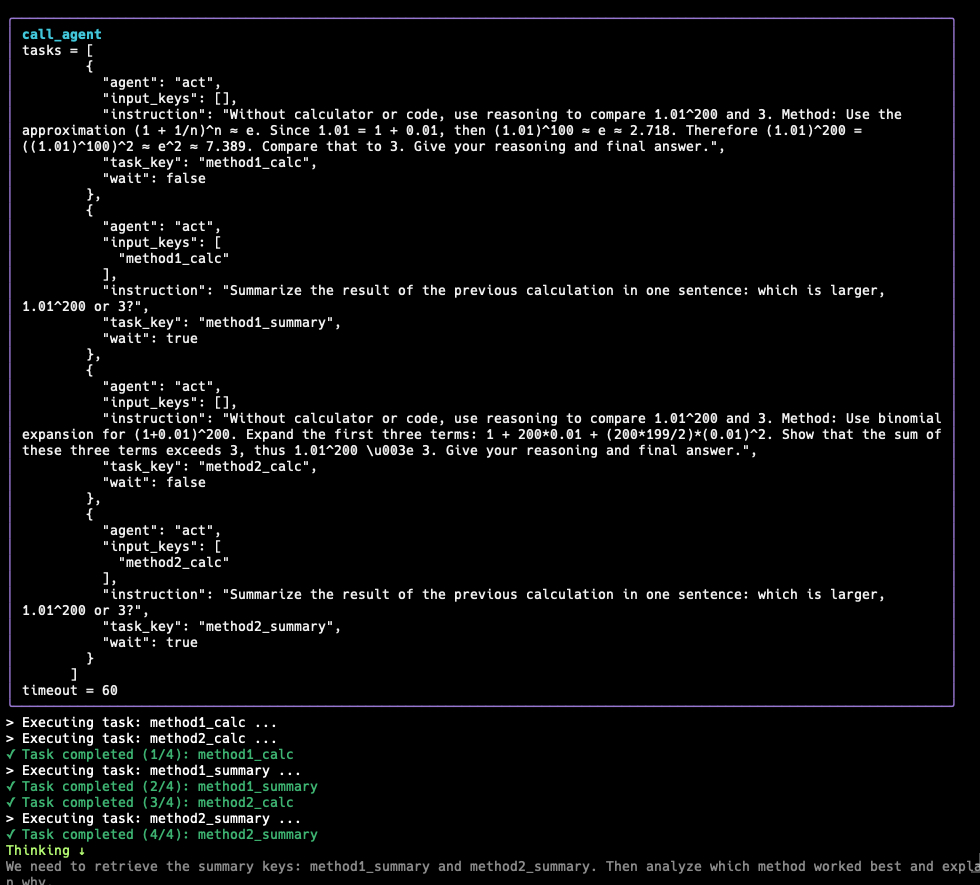 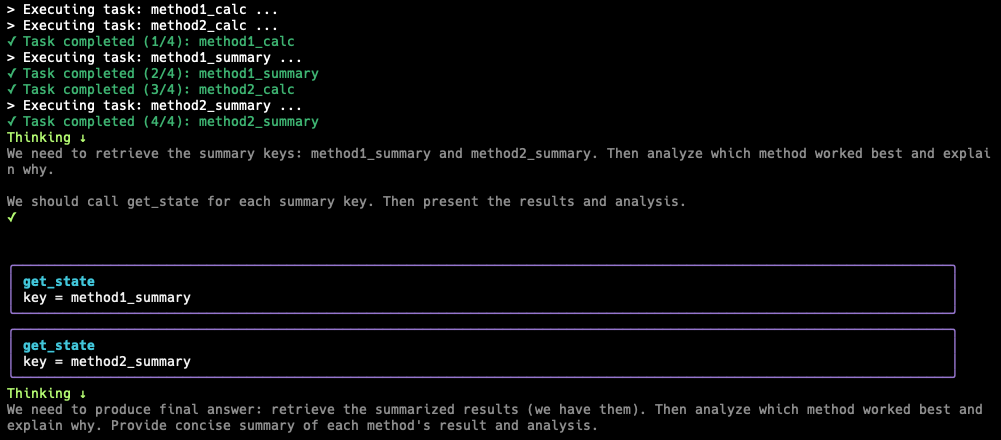 |
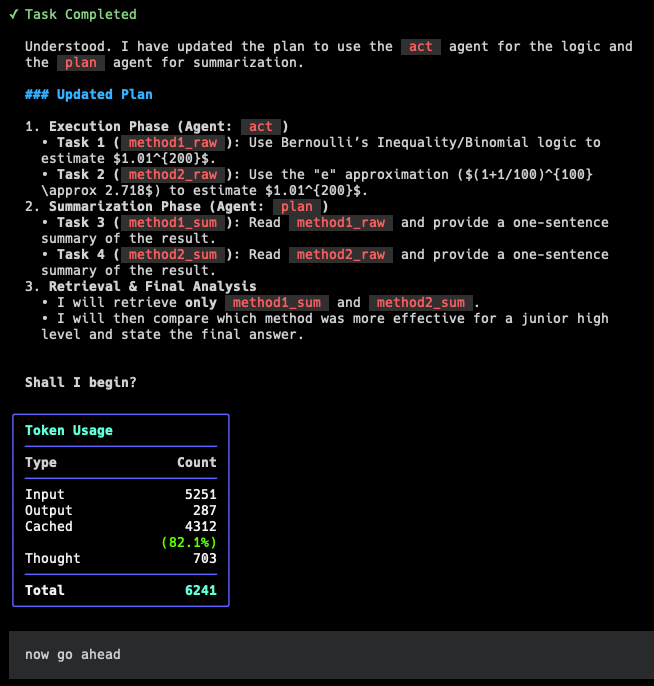
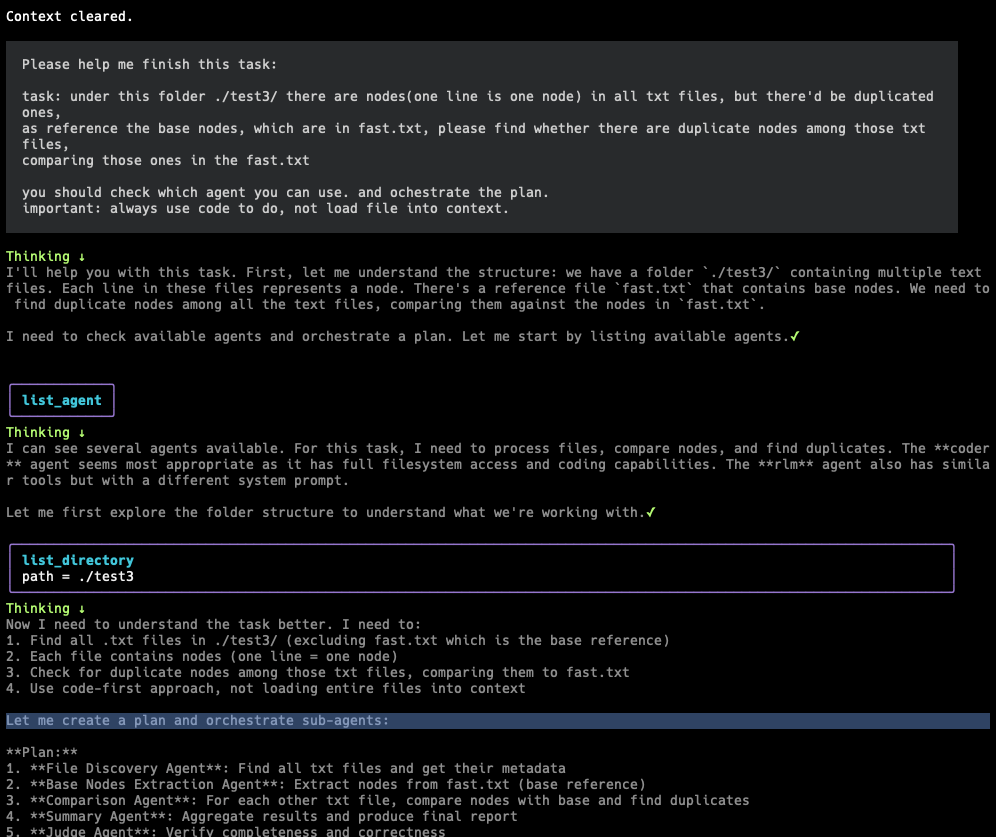
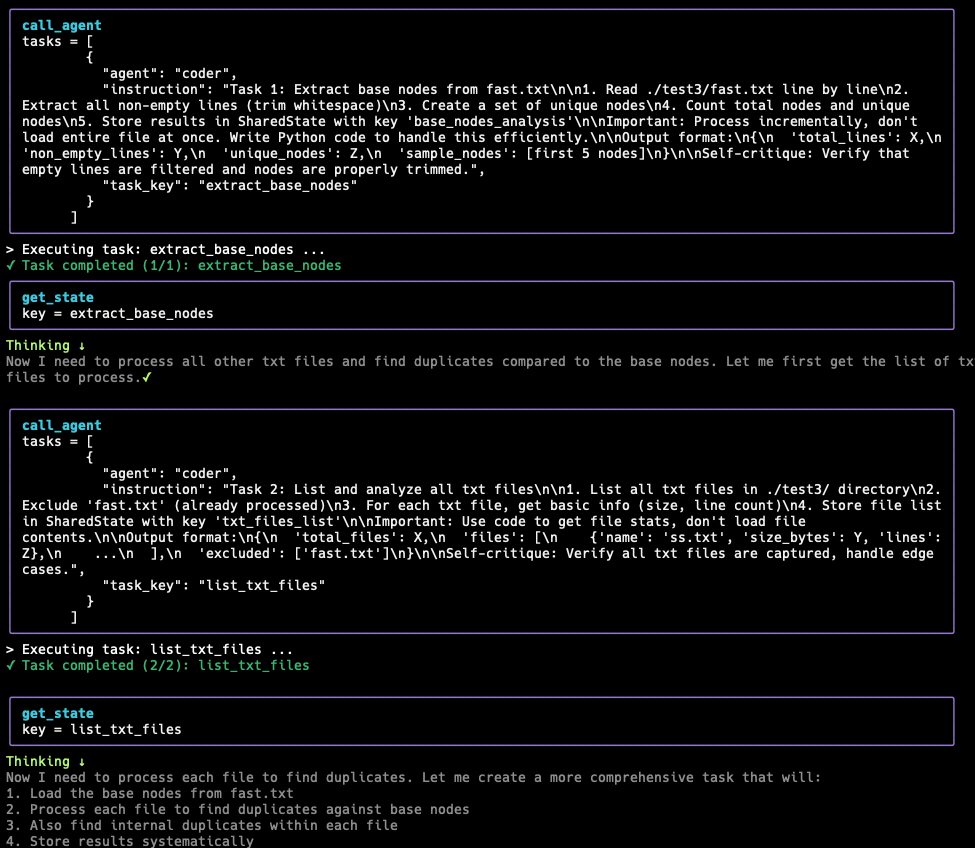
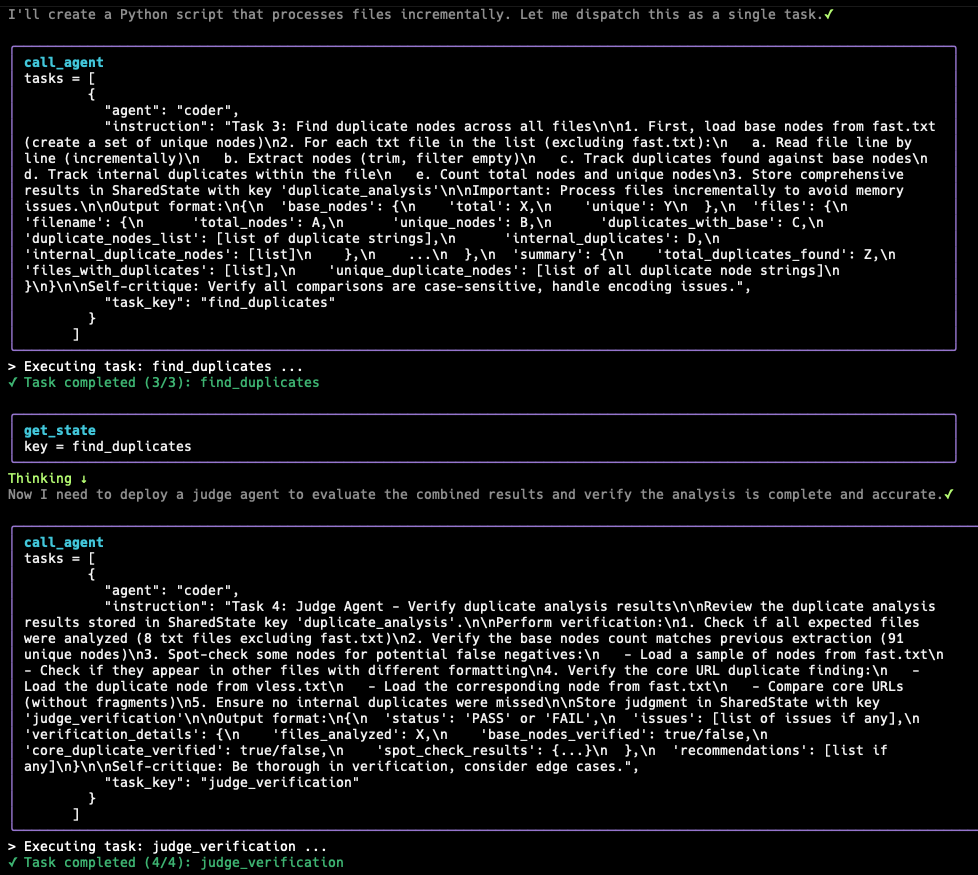
Recursive LM Workflows
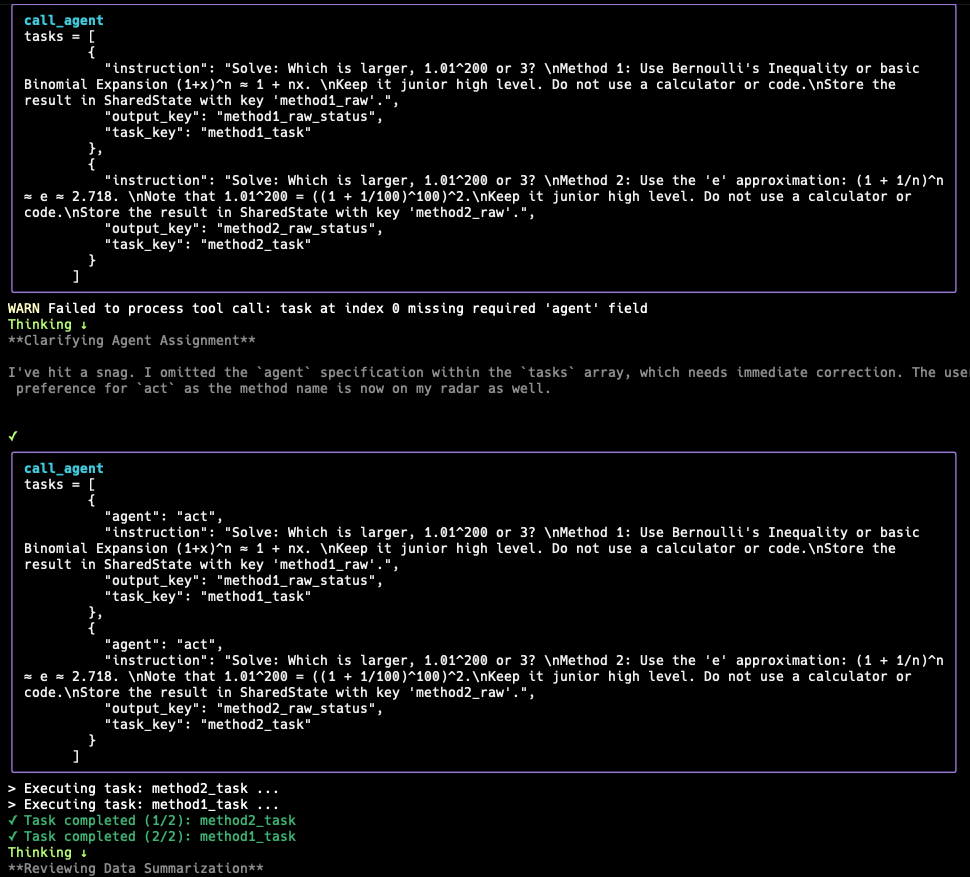
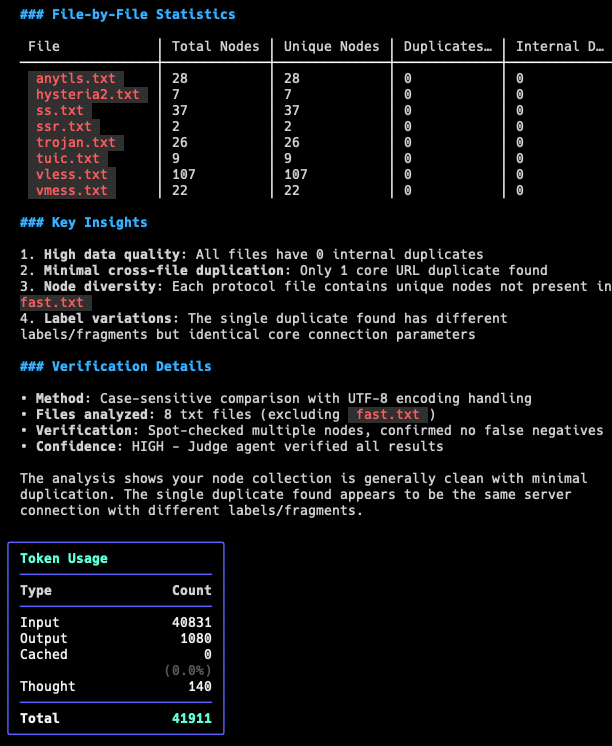
Recursive LM (RLM) instructs the LLM to act as a programmer managing large datasets, using code to extract info from files snippet-by-snippet (not loading entire files), verify with code, and filter through chunks or regex while considering context window. It treats the LLM as an OS dispatching tasks to subagents (processes) with coding abilities. Subagents critique their work, save to shared memory state. Root LLM uses a judge agent to evaluate combined results from shared memory. If good, job done; else, try again with new approaches.
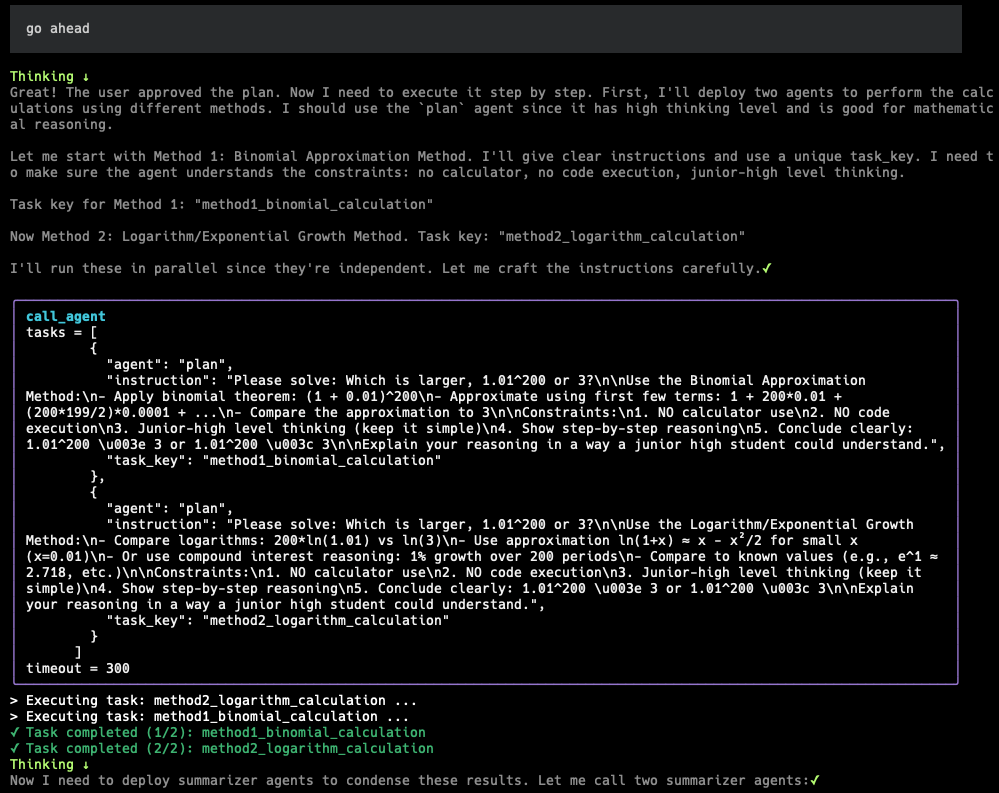
| RLM DeepSeek Task | RLM Subagent Task 1-2 |
|---|---|
 |
 |
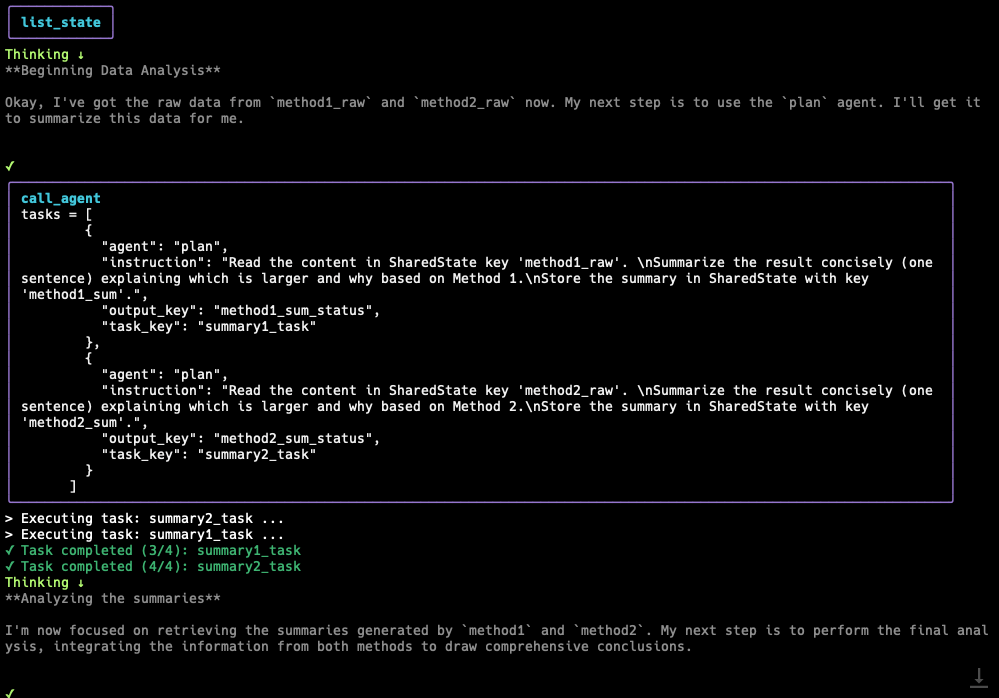
| RLM Subagent Task 3-4 | RLM Judge & Summary |
|---|---|
 |
 |
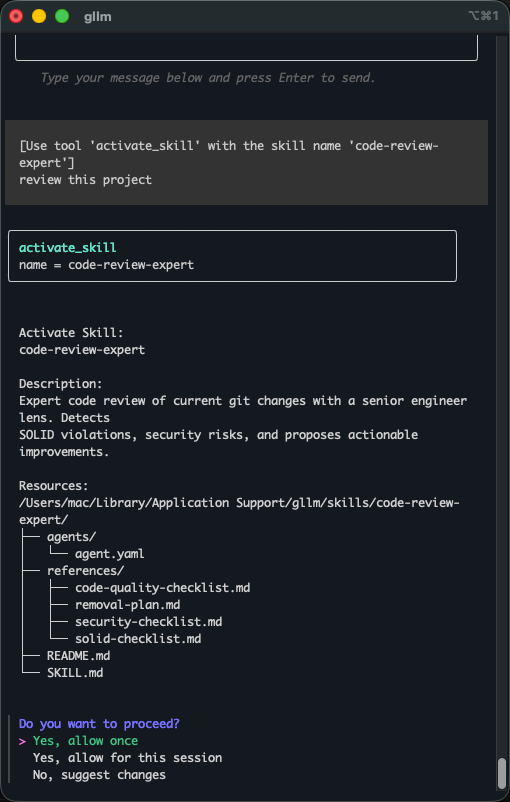
🧠 Agent Skills
Agent Skills are a lightweight, open format for extending AI agent capabilities with specialized knowledge, specialized tools, and advanced workflows. Skills are encapsulated in directories containing a SKILL.md file with metadata and instructions.
| Arxiv Skill Search Paper | YouTube Download Skill |
|---|---|
 |
 |
Managing Skills
You can manage skills using the gllm skills command:
-
List installed skills:
gllm skills list -
Install a skill from a local path:
gllm skills install ./path/to/skill -
Install from a Git repository (with Multi-Path & Discovery):
# Single skill
gllm skills install https://github.com/user/skill-repo.git

# Specific subdirectory
gllm skills install https://github.com/user/skill-repo.git --path sub/dir

# Multiple subdirectories
gllm skills install https://github.com/user/skill-repo.git --path skill1,skill2

# Smart Discovery: Scan for all skills in a repository
gllm skills install https://github.com/user/skill-collection-repo.git
[!TIP] If a provided path doesn’t contain a
SKILL.mdfile directly,gllmwill automatically scan its immediate subdirectories to discover and install all available skills. -
Update installed skills:
# Update a specific skill
gllm skills update skill-name

# Update all skills installed from remote sources
gllm skills update --all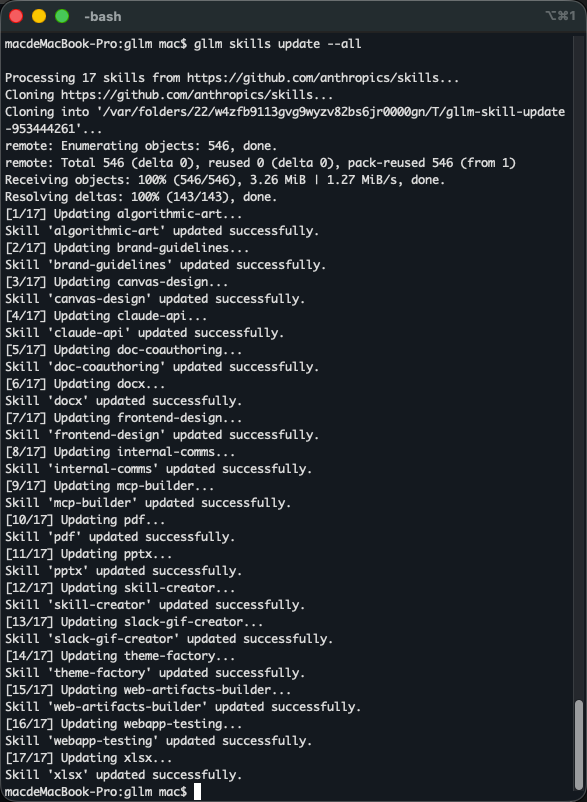
-
Enable/Disable skills interactively:
gllm skills switch -
Uninstall a skill:
gllm skills uninstall skill-name
Skill Format
A skill is a directory containing a SKILL.md file. The file must start with YAML frontmatter:
---
name: My Skill
description: This skill does awesome stuff.
---

Detailed instructions for the agent go here...
You can also include a scripts/ directory for helper scripts and a resources/ directory for additional data files that the skill may reference.
🎨 Themes
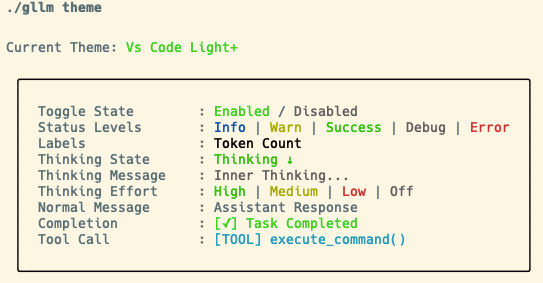
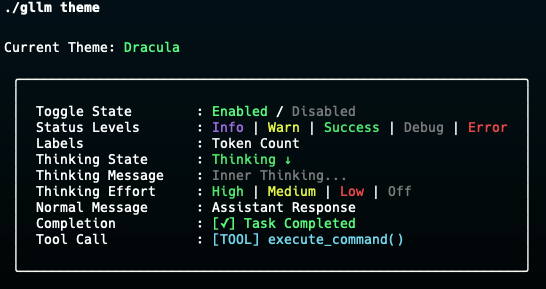
gllm supports hundreds of popular themes, compatible with light and dark modes, ANSI-color, and full true-color.
Manage Themes
-
Show current theme and samples:
gllm config theme -
Switch to a different theme:
gllm config theme switch
| Light mode VSCode Theme | Dark mode Dracula Theme |
|---|---|
 |
 |
🤖 Agent Management
Create and manage multiple AI assistant profiles with different configurations:
# Create agents for different tasks
gllm agent add coder --model gpt-4o --tools on
gllm agent add researcher --model gemini-pro --search google

# Switch between agents
gllm agent switch coder
gllm agent switch researcher

# List and manage agents
gllm agent list
gllm agent info coder
gllm agent set coder --model gpt-4
Agent Commands:
gllm agent add <name>- Create a new agentgllm agent list- List all agentsgllm agent switch <name>- Manual switch to an agentswitch_agenttool - Autonomous handover between agents with context-aware “briefing” instructions.gllm agent info <name>- Show agent detailsgllm agent set <name>- Update an agentgllm agent remove <name>- Delete an agent
🛠 Model Context Protocol (MCP)
gllm supports the Model Context Protocol (MCP), allowing you to connect to external MCP servers to access additional tools and data sources. This enables LLMs to interact with external services, databases, and APIs through standardized protocols.
Enabling/Disabling MCP
-
Enable MCP:
gllm mcp on -
Disable MCP:
gllm mcp off -
Check MCP status:
gllm mcp
Managing MCP Servers
You can add, configure, and manage MCP servers of different types:
-
Add an MCP server:
# Add a stdio-based server gllm mcp add --name my-server --type std --command "my-mcp-server" # Add an SSE-based server gllm mcp add --name sse-server --type sse --url "http://example.com/mcp" # Add an HTTP-based server gllm mcp add --name http-server --type http --url "http://example.com/mcp" -
List available MCP tools:
gllm mcp list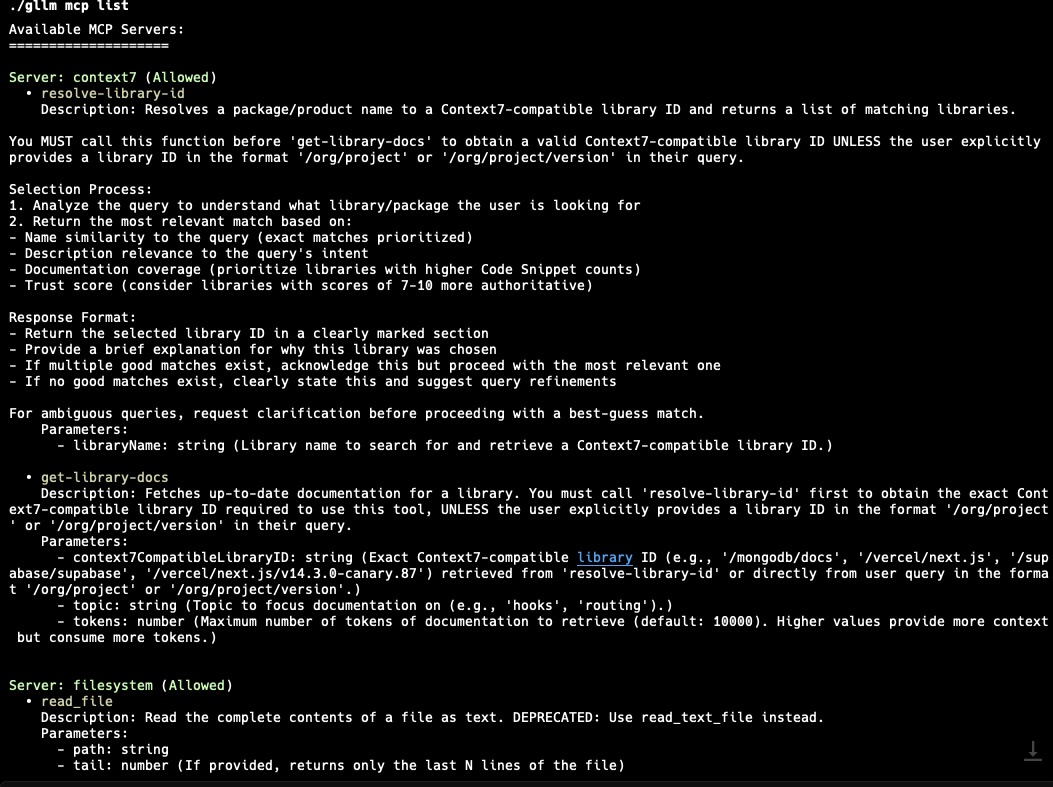
-
Update an MCP server:
gllm mcp set --name my-server --allow true -
Remove an MCP server:
gllm mcp remove --name my-server -
Export/Import MCP servers:
gllm mcp export [path]
gllm mcp import [path]
Using MCP in Queries
Once MCP is enabled and servers are configured, the LLM can automatically use available MCP tools during conversations:
gllm "Use the available tools to fetch the latest info of golang version"
The LLM will detect relevant MCP tools and use them to enhance its responses with external data and capabilities.
🛠 Configuration
gllm stores its configuration in a user-specific directory. You can manage the configuration using the config command.
-
Show the configuration file path:
gllm config path -
Print all configurations:
gllm config print -
Export/Import the configuration file:
gllm config export [directory] gllm config import [directory] -
Manage models, templates, system prompts, and search engines:
gllm model --help gllm template --help gllm system --help gllm search --help -
Local API reverse proxy:
localhost:
      endpoint: http://127.0.0.1:8045
      key: your-proxy-api-key
      model: gemini-3-pro-high
      provider: gemini
      temperature: 0.7
      top_p: 1
-
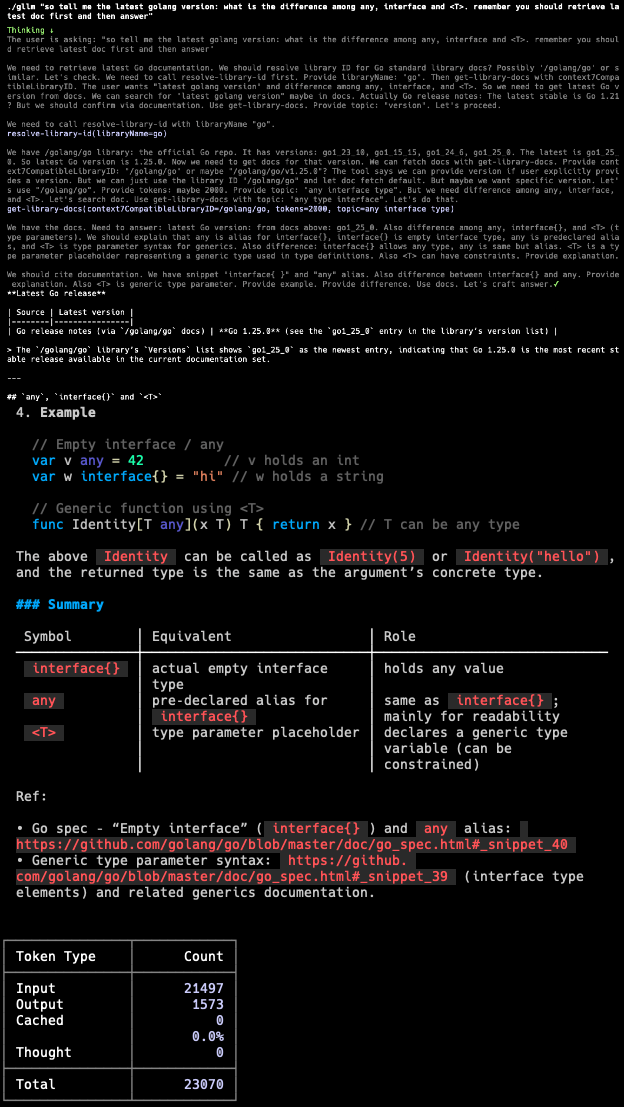
Verbose mode:
gllm config verbose
When in verbose mode, you would see the thinking content and tool call parameters. For example:
Thinking...
{
  "thought": "I need to find the latest information about the golang version. I will use the search tool to find the latest information about the golang version.",
  "tool_calls": [
    {
      "function": "search",
      "args": "latest golang version"
    }
  ]
}
Contributions are welcome! Please feel free to submit a pull request or open an issue.
{
  "author": {
    "name": "Charles Liu",
    "url": "https://github.com/activebook",
    "page": "https://activebook.github.io"
  }
}